happytodev / blogr
Blogr is a FilamentPHP plugin that adds a powerful blog system to your Laravel application.
Fund package maintenance!
happytodev
Installs: 76
Dependents: 0
Suggesters: 0
Security: 0
Stars: 16
Watchers: 0
Forks: 2
Open Issues: 31
pkg:composer/happytodev/blogr
Requires
- php: ^8.3
- filament/actions: ^4.0
- filament/filament: ^4.0
- spatie/laravel-package-tools: ^1.15.0
- spatie/laravel-permission: ^6.0
- spatie/yaml-front-matter: ^2.1
Requires (Dev)
- nunomaduro/collision: ^8.8
- orchestra/testbench: ^10.6
- pestphp/pest: ^4.0
- pestphp/pest-plugin-arch: ^4.0
- pestphp/pest-plugin-browser: ^4.0
- pestphp/pest-plugin-laravel: ^4.0
- dev-main
- 0.16.0
- 0.15.12
- 0.15.11
- 0.15.10
- 0.15.9
- 0.15.8
- 0.15.7
- 0.15.6
- 0.15.5
- 0.15.4
- 0.15.3
- 0.15.2
- 0.15.1
- 0.15.0
- 0.14.1
- 0.14.0
- 0.13.0
- 0.12.5
- 0.12.4
- 0.12.3
- 0.12.2
- 0.12.1
- 0.12.0
- 0.11.2
- 0.11.1
- 0.11.0
- 0.10.2
- 0.10.1
- 0.10.0
- 0.9.1
- 0.9.0
- 0.8.3
- 0.8.2
- 0.8.1
- 0.8.0
- 0.7.0
- 0.6.1
- 0.6.0
- 0.5.0
- 0.4.1
- 0.4.0
- 0.3.2
- 0.3.1
- 0.3.0
- 0.2.2
- 0.2.1
- 0.2.0
- v0.1.4
- v0.1.3
- v0.1.2
- v0.1.1
- v0.1.0
- dev-feature/add-analytics-feature
This package is auto-updated.
Last update: 2026-01-29 21:20:22 UTC
README
🚀 Blogr – The Ultimate FilamentPHP Blog Plugin

A production-ready, feature-rich blog system for Laravel & FilamentPHP
Features • Installation • Documentation • Screenshots • Support
✨ Overview
Transform your Laravel application into a powerful blogging platform with Blogr – a comprehensive FilamentPHP plugin designed for developers who demand excellence. Built with modern best practices, fully tested (725+ tests), and packed with features you'll actually use.
Why Blogr?
- 🌍 True Multilingual – Translate everything (posts, series, categories, tags)
- 📚 Blog Series – Organize content into cohesive learning paths
- CMS Page Builder – Create static pages (About, Contact, etc.) with block system
- 💾 Backup & Restore – Export/import all data with media files
- 🎨 Fully Customizable – Theme system, dark mode, configurable UI
- 🔍 SEO Optimized – Meta tags, Open Graph, Schema.org, RSS feeds
- ⚡ Production Ready – Comprehensive test coverage, battle-tested code
🎯 Key Features
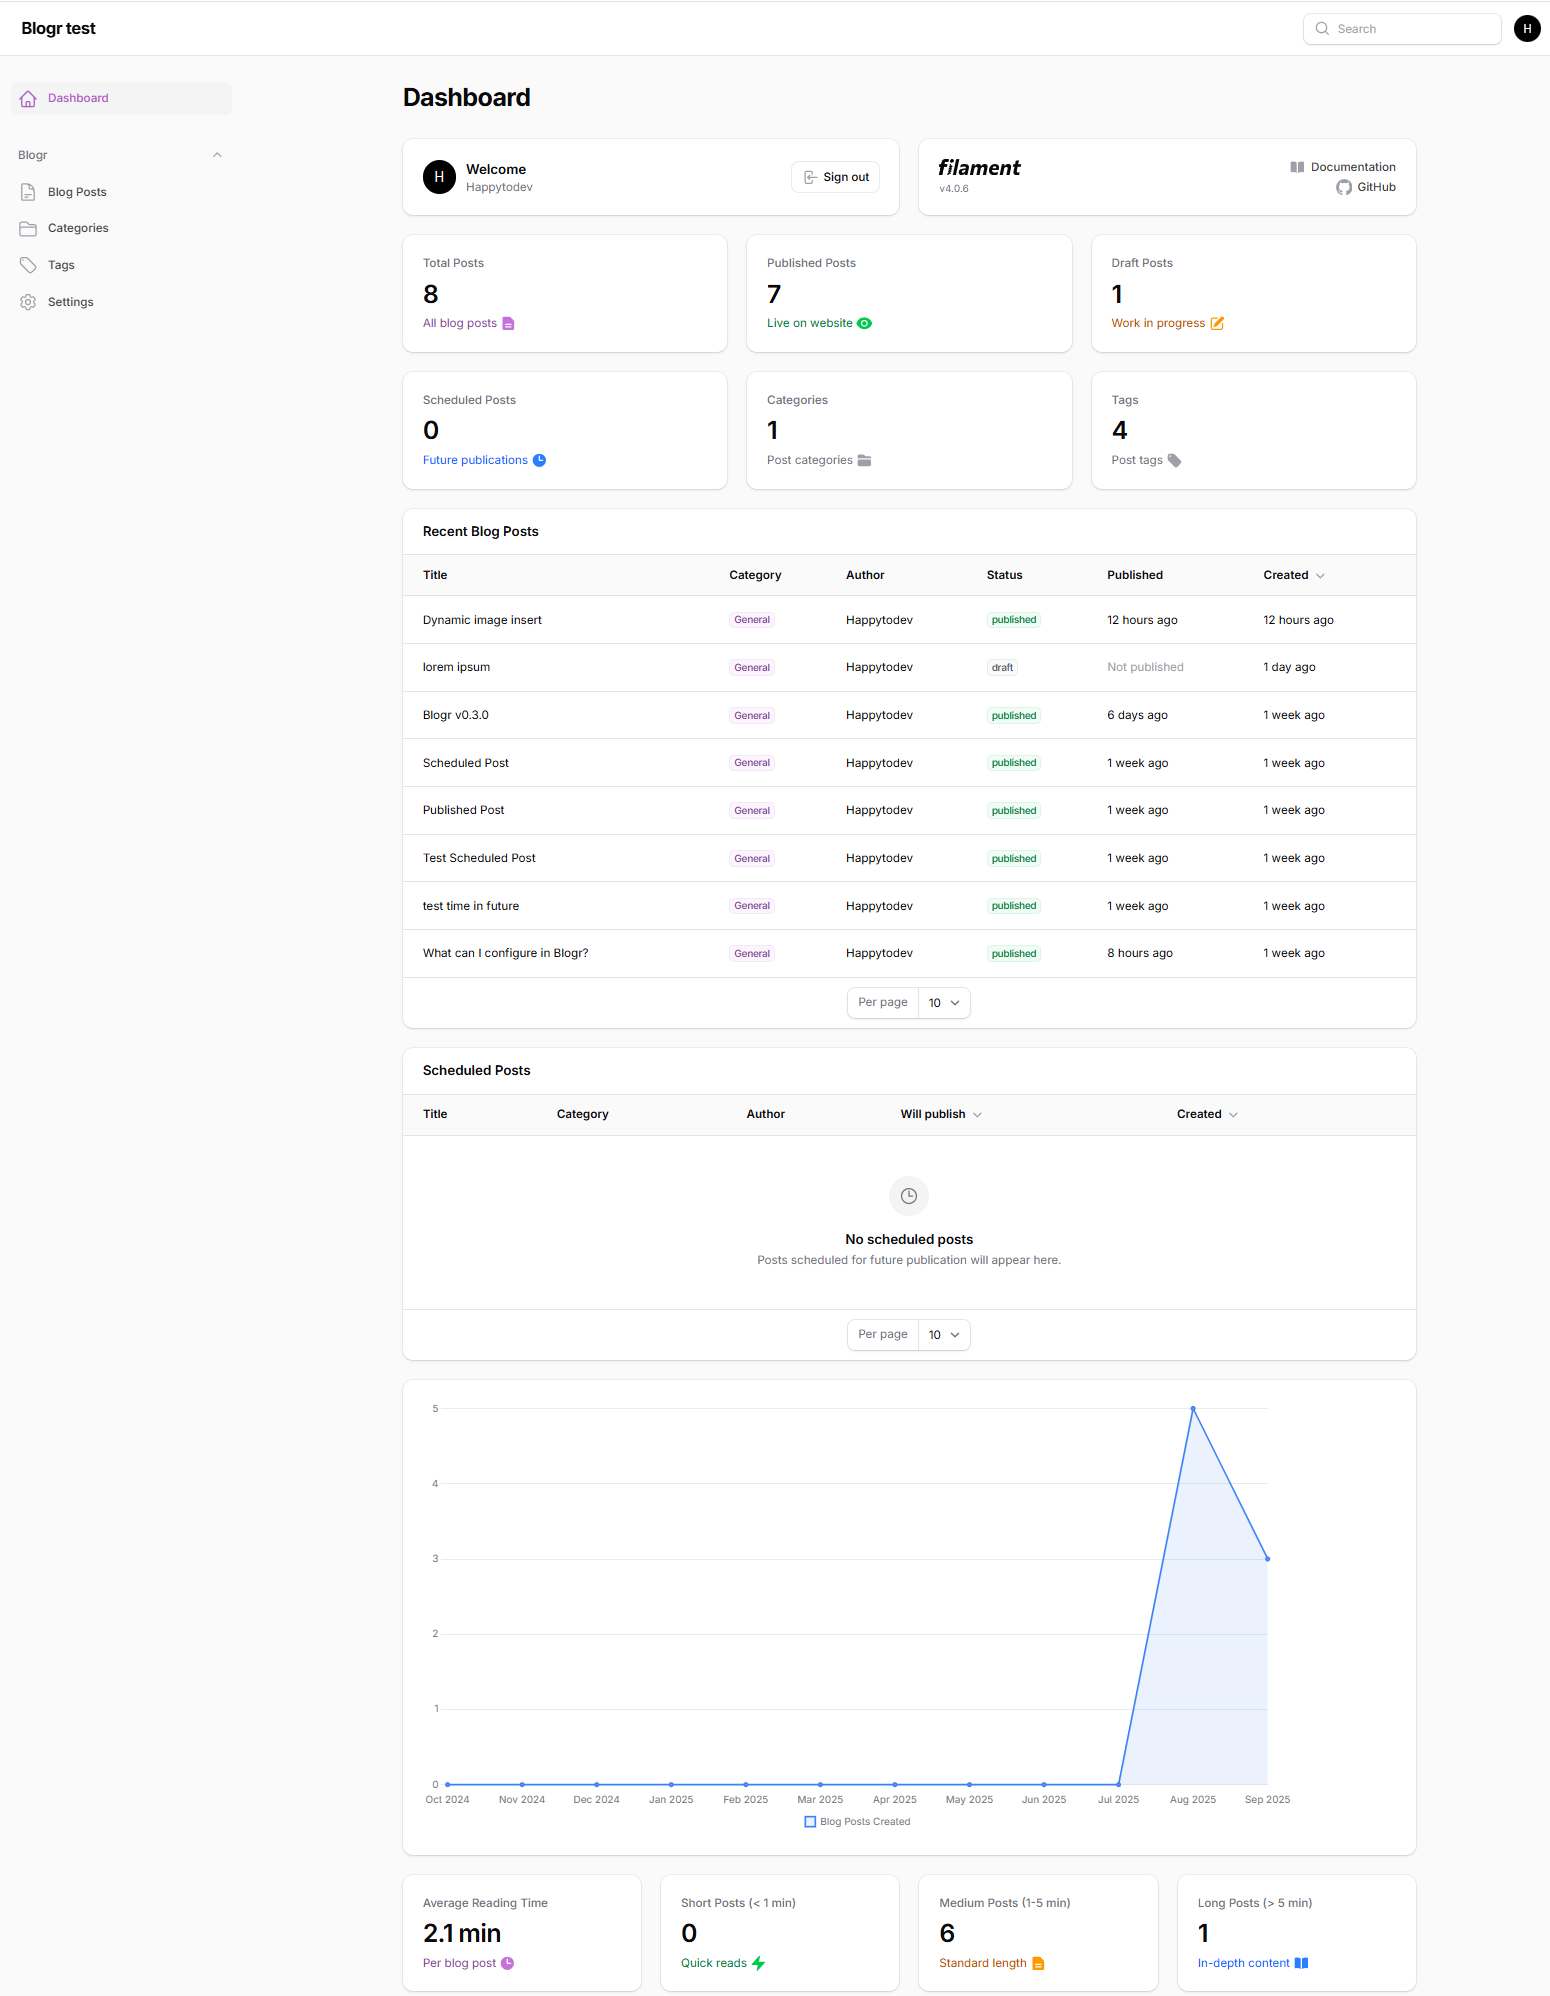
📊 Dashboard Widgets
Six powerful widgets to monitor your blog:
- BlogStatsOverview – Posts, categories, tags metrics
- RecentBlogPosts – Latest posts with quick actions
- ScheduledPosts – Upcoming publications
- BlogPostsChart – Publication trends (12 months)
- QuickVisitSite – One-click access to public blog ✨ NEW
- BlogReadingStats – Reading time analytics
👥 Author Features
- Enhanced profiles with bio (Markdown support)
- Avatar management with auto-fallback
- Author pages (
/blog/author/{userId}) - Role-based permissions (Admin, Writer)
- Self-service profile editing
⚙️ Admin Experience
- Filament v4 native integration
- Global Search across all resources (posts, users, CMS pages)
- Improved Tables with sorting, filtering, and better UX
- Intuitive settings page with tabs
- Tutorial content for onboarding
- Demo seeders for quick start
- Admin notifications for writer post creation
- Extensive documentation
📸 Screenshots
🖼️ Click to view screenshots
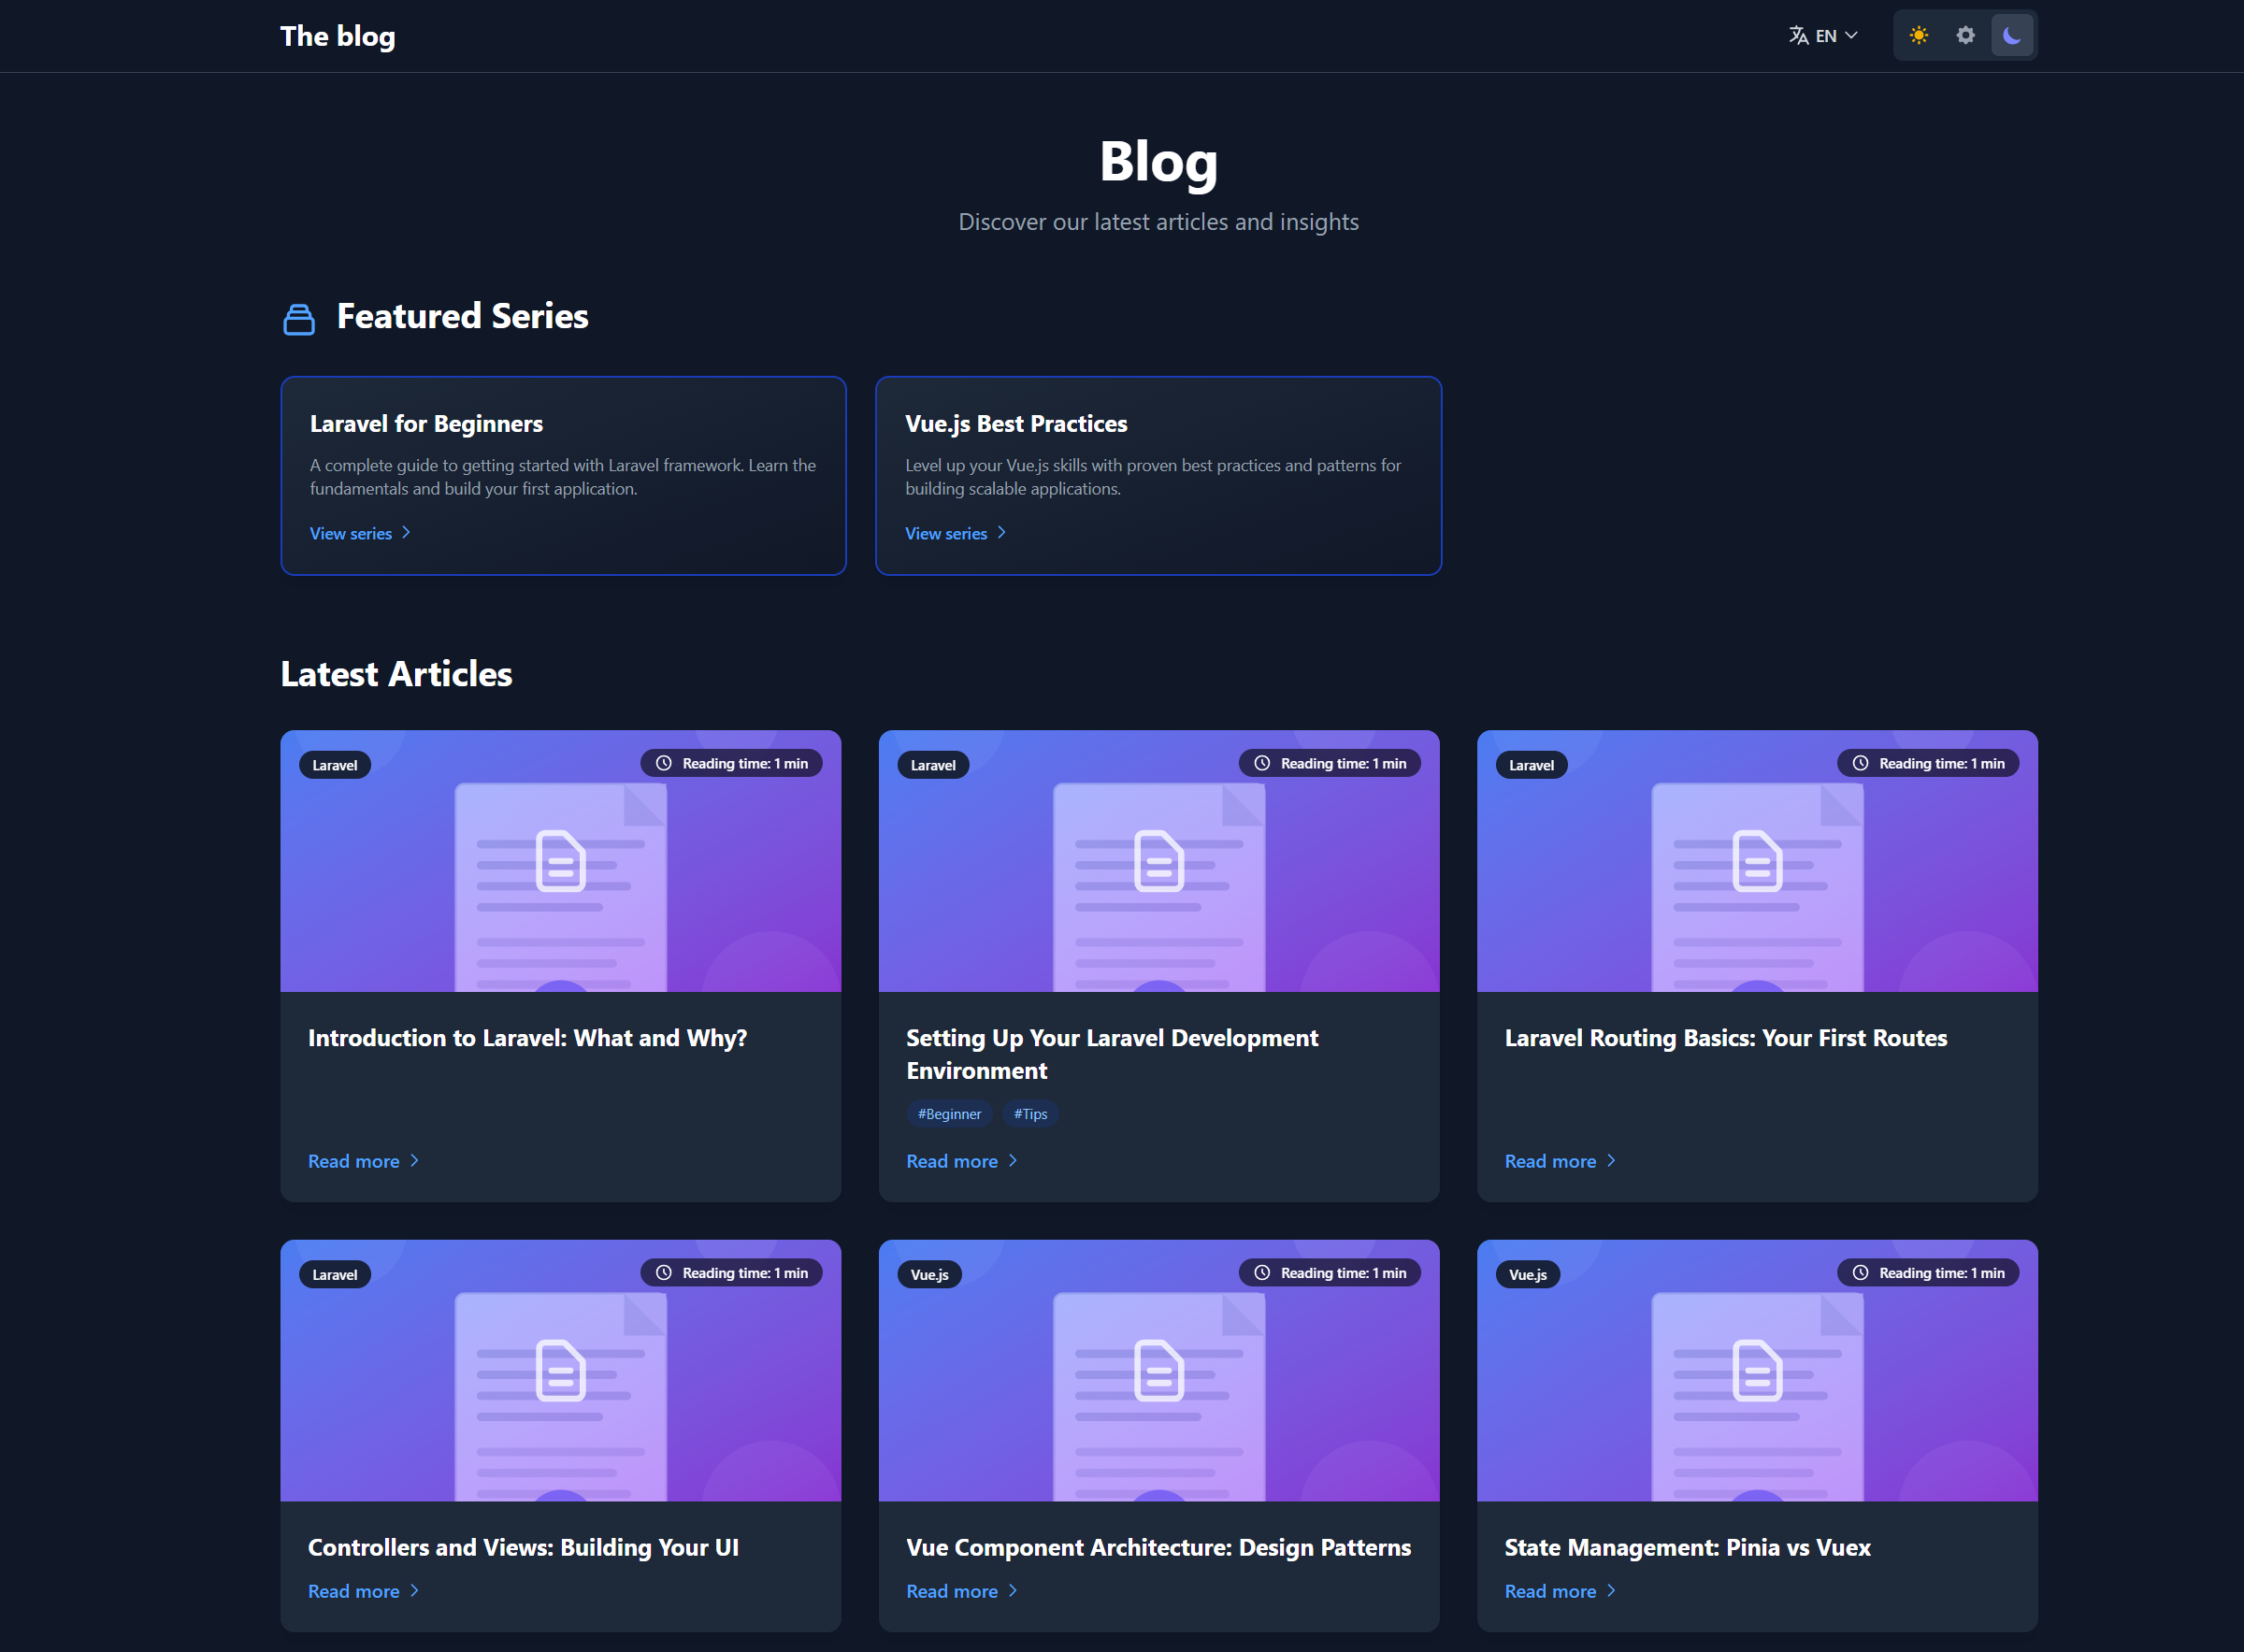
Frontend Views
Blog Home Page
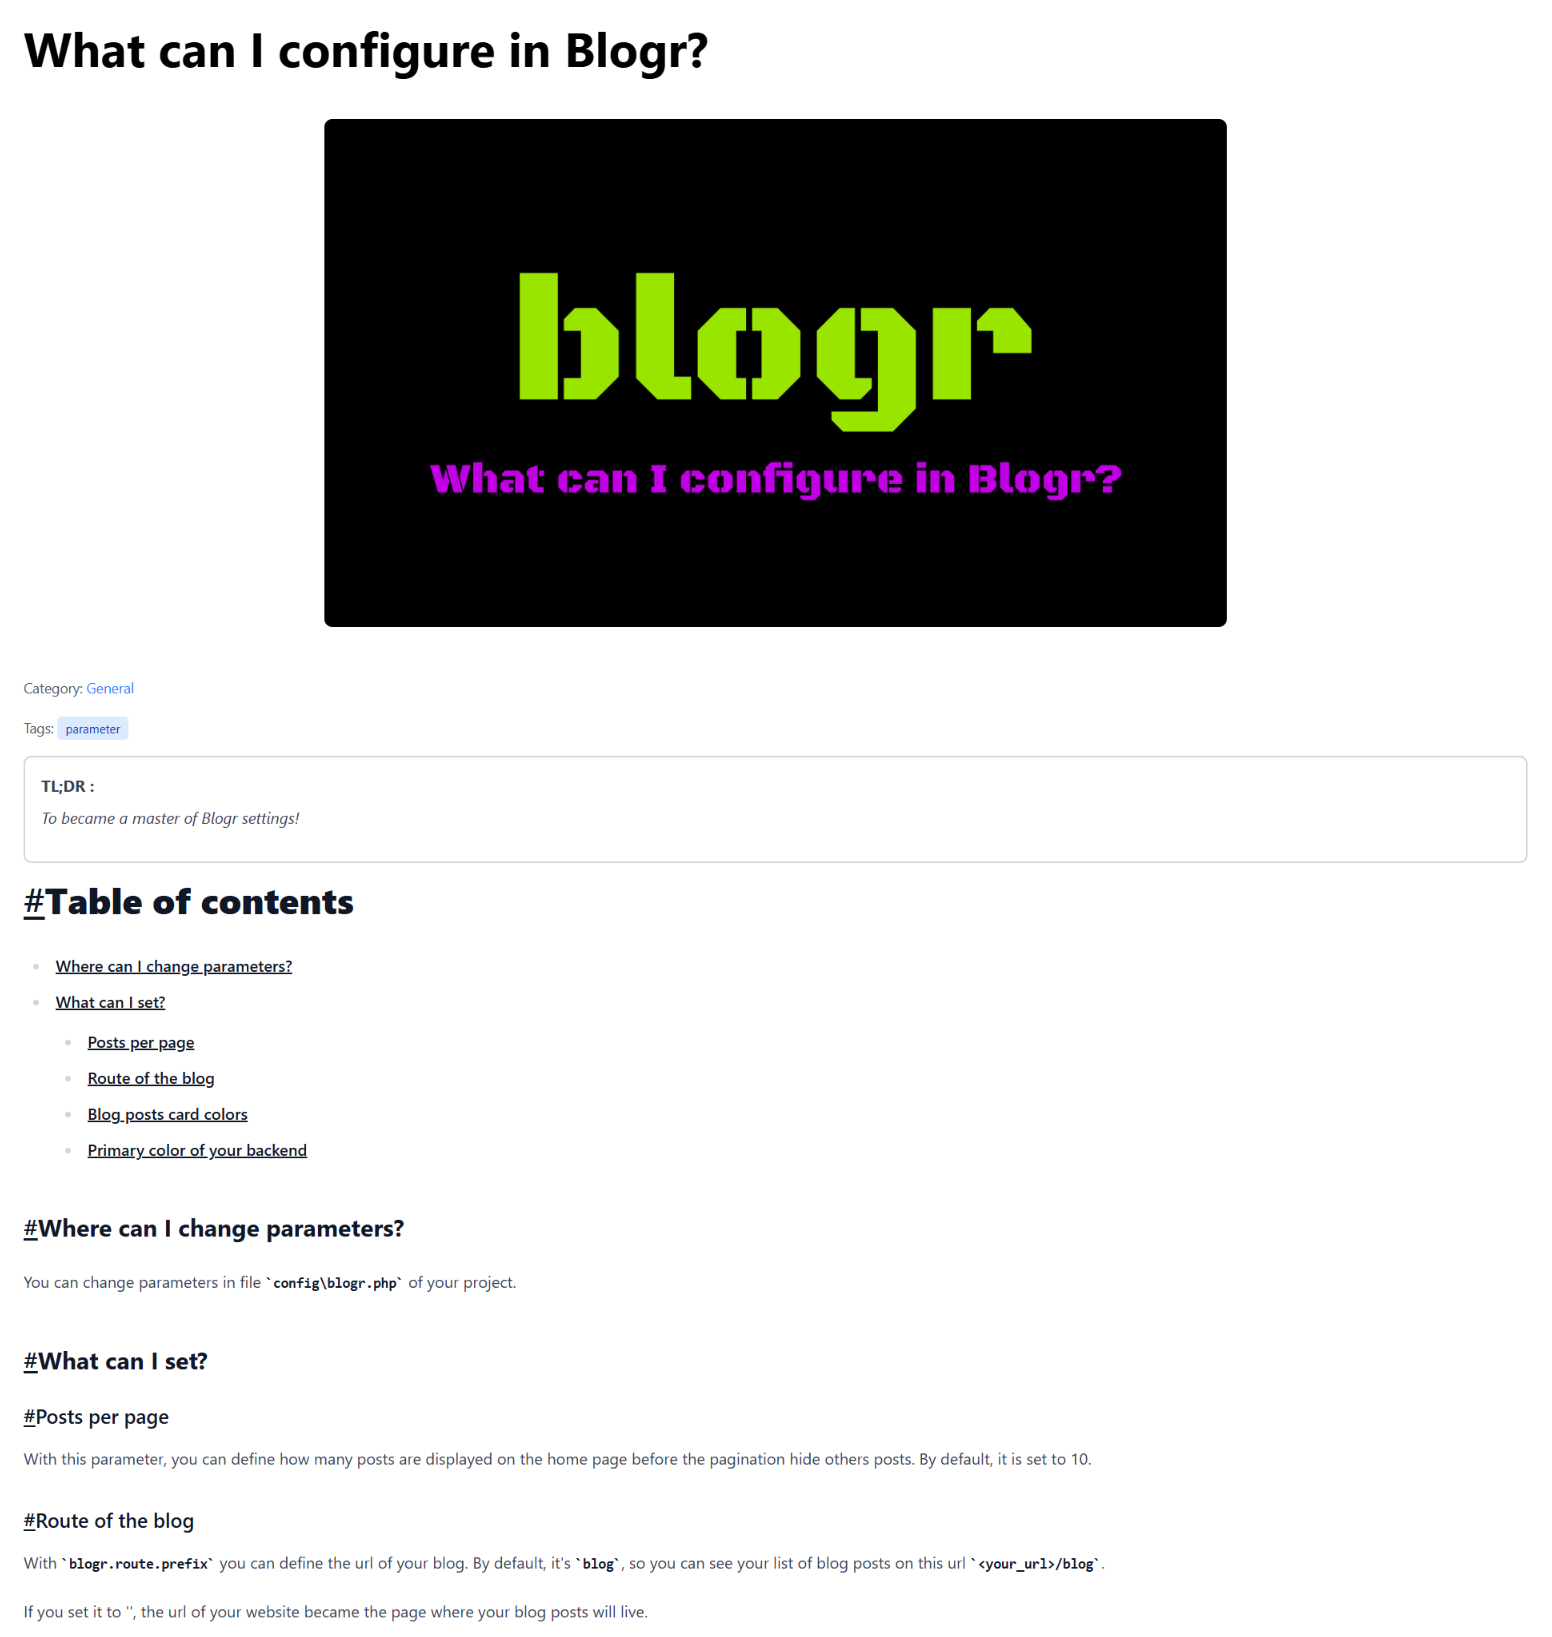
Blog Post View
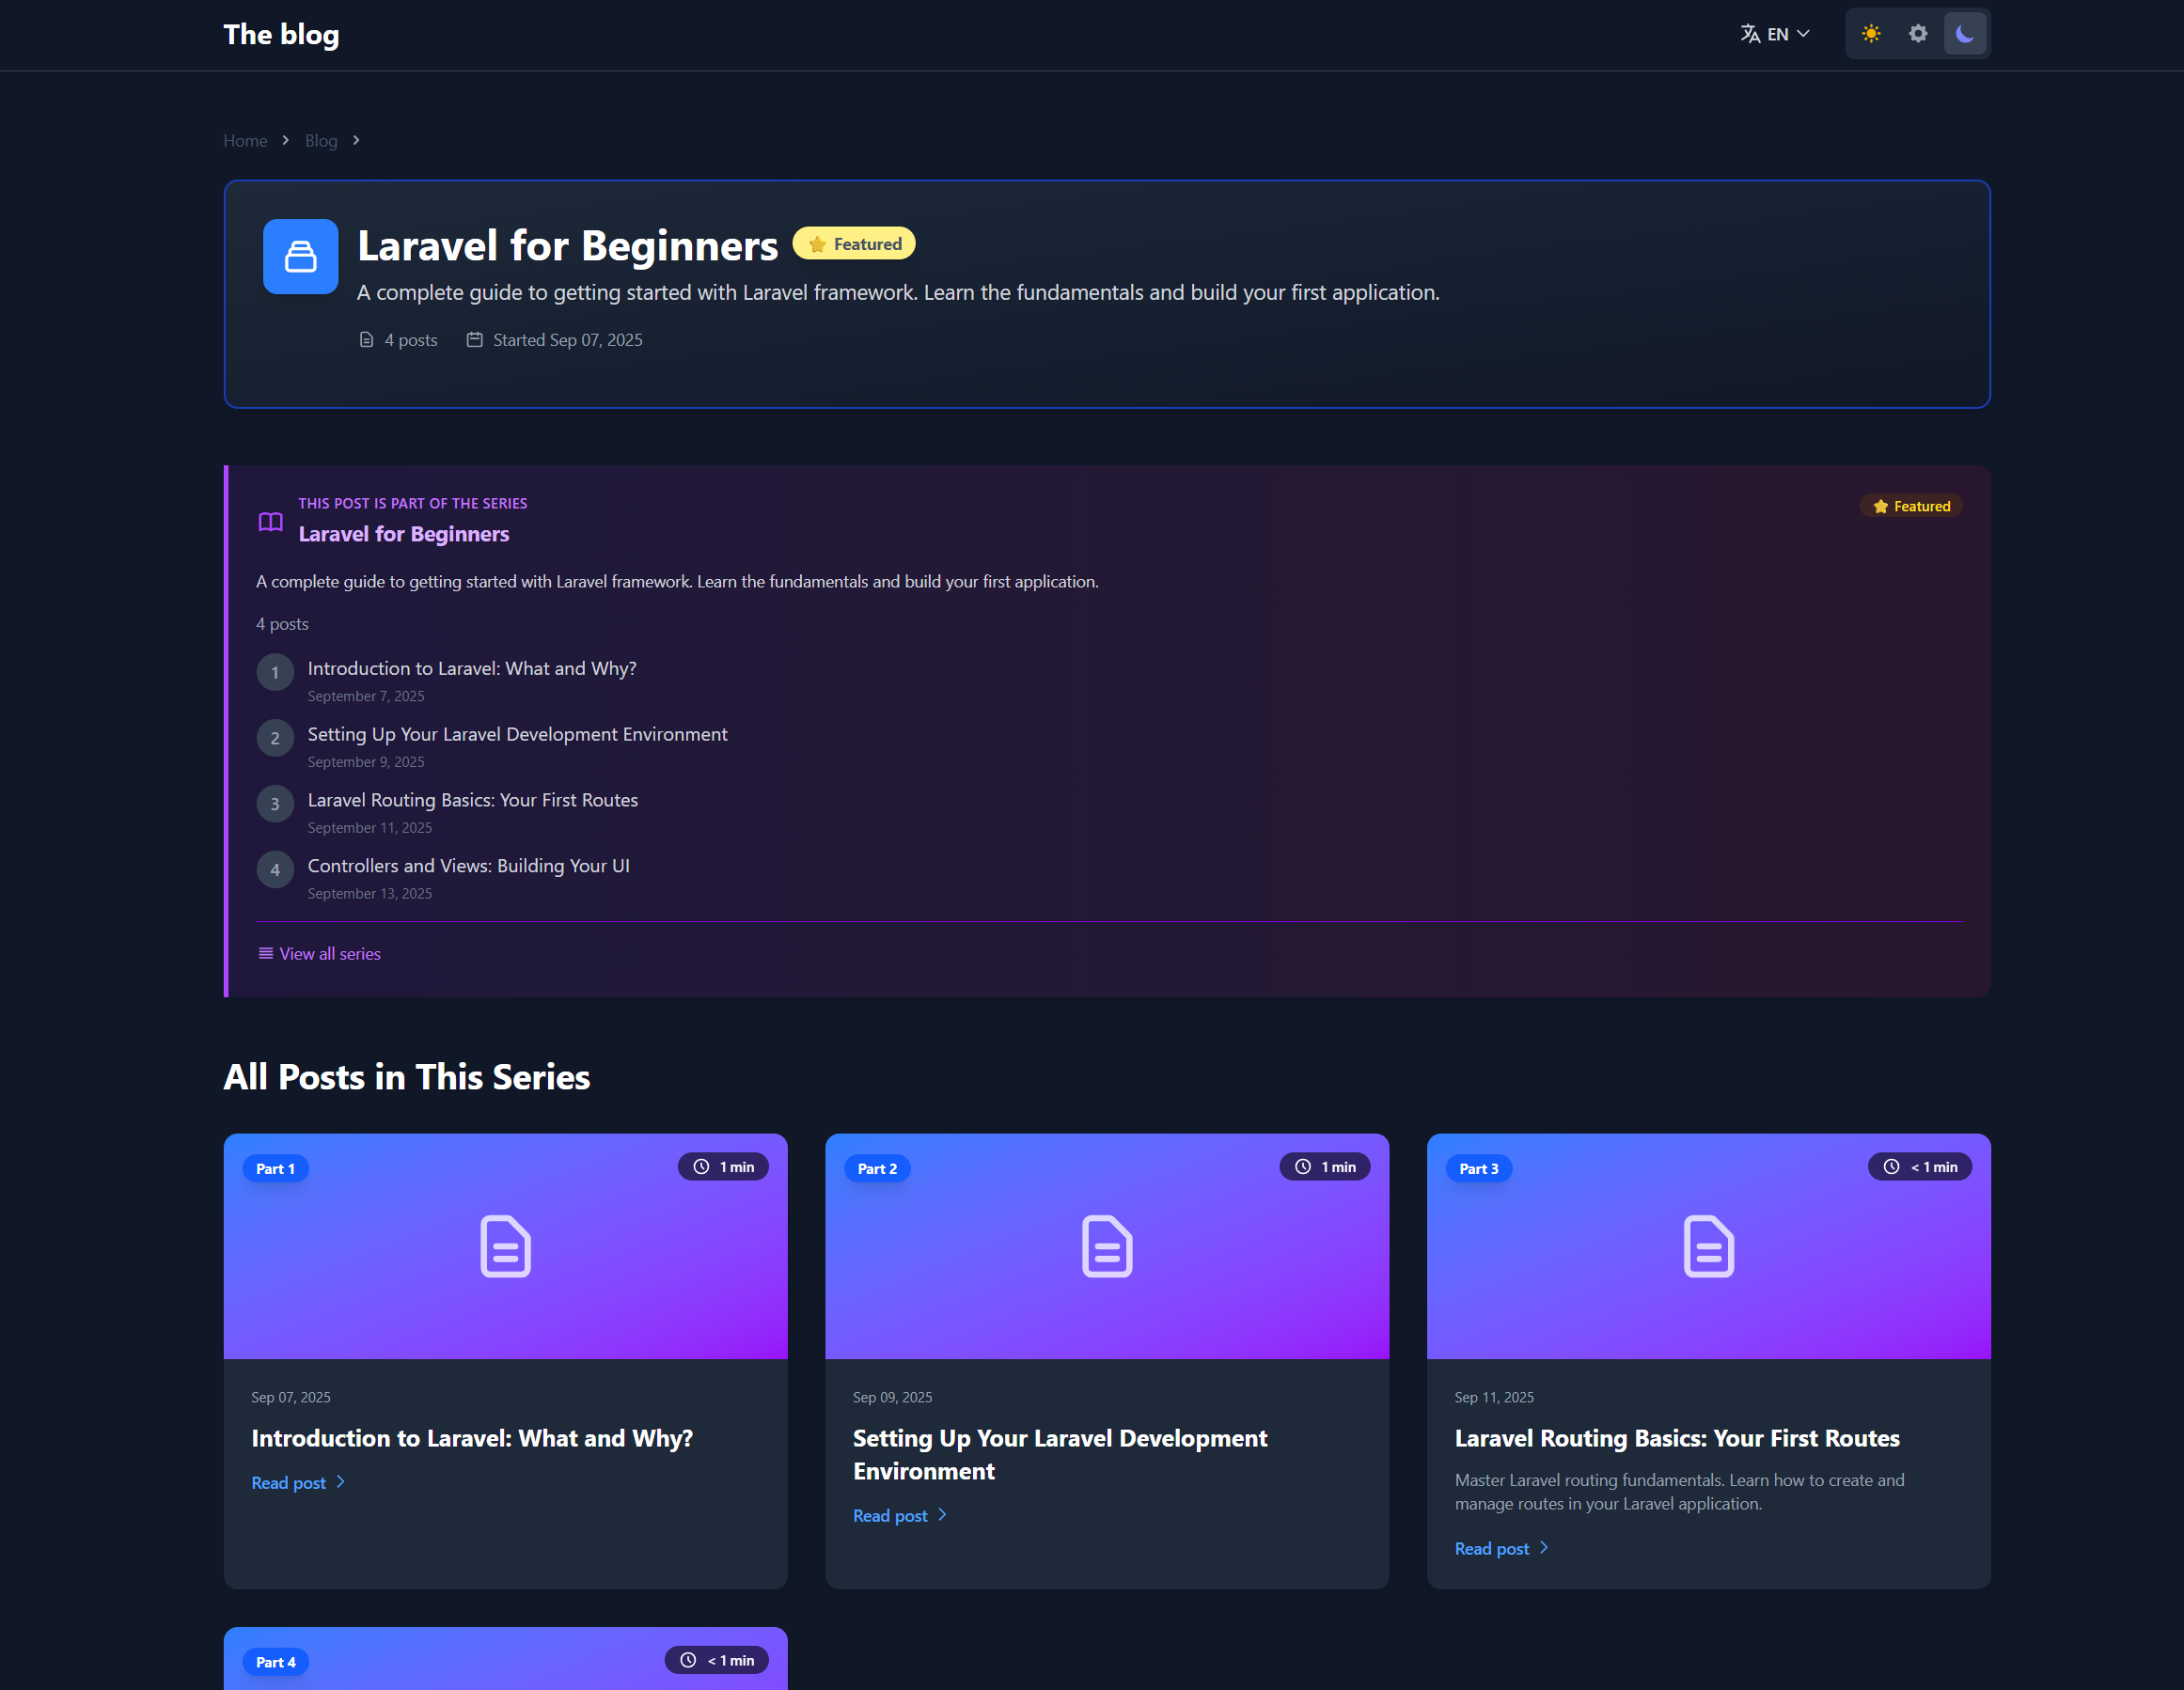
Blog Series
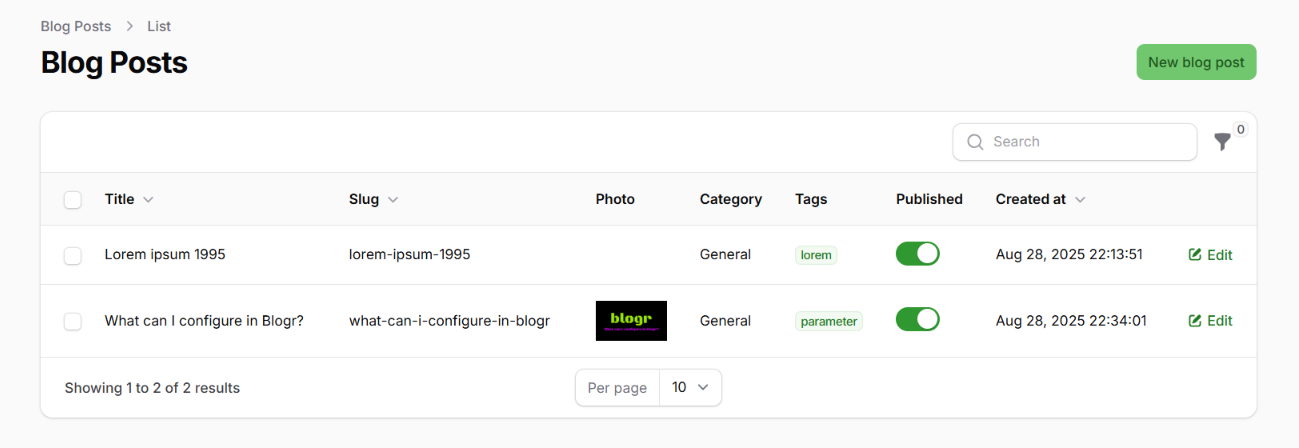
Admin Panel
Posts List
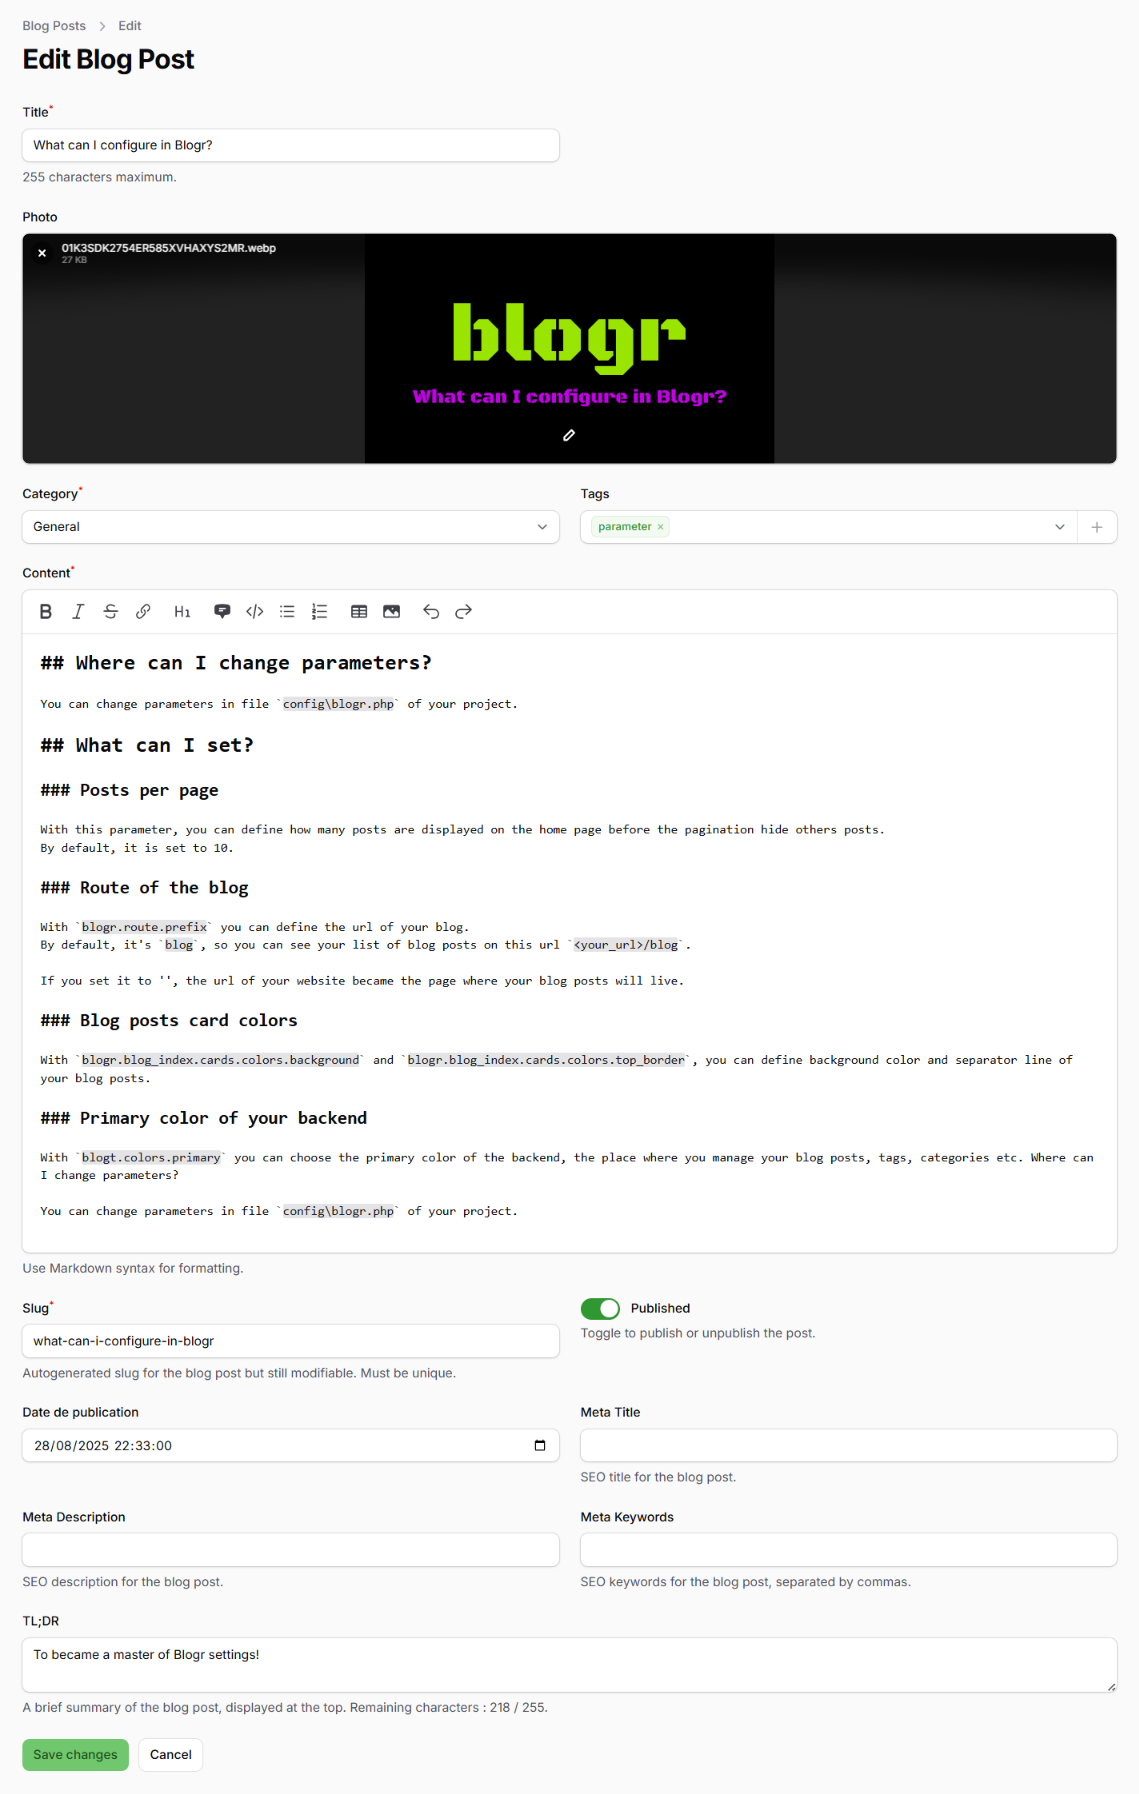
Post Editor
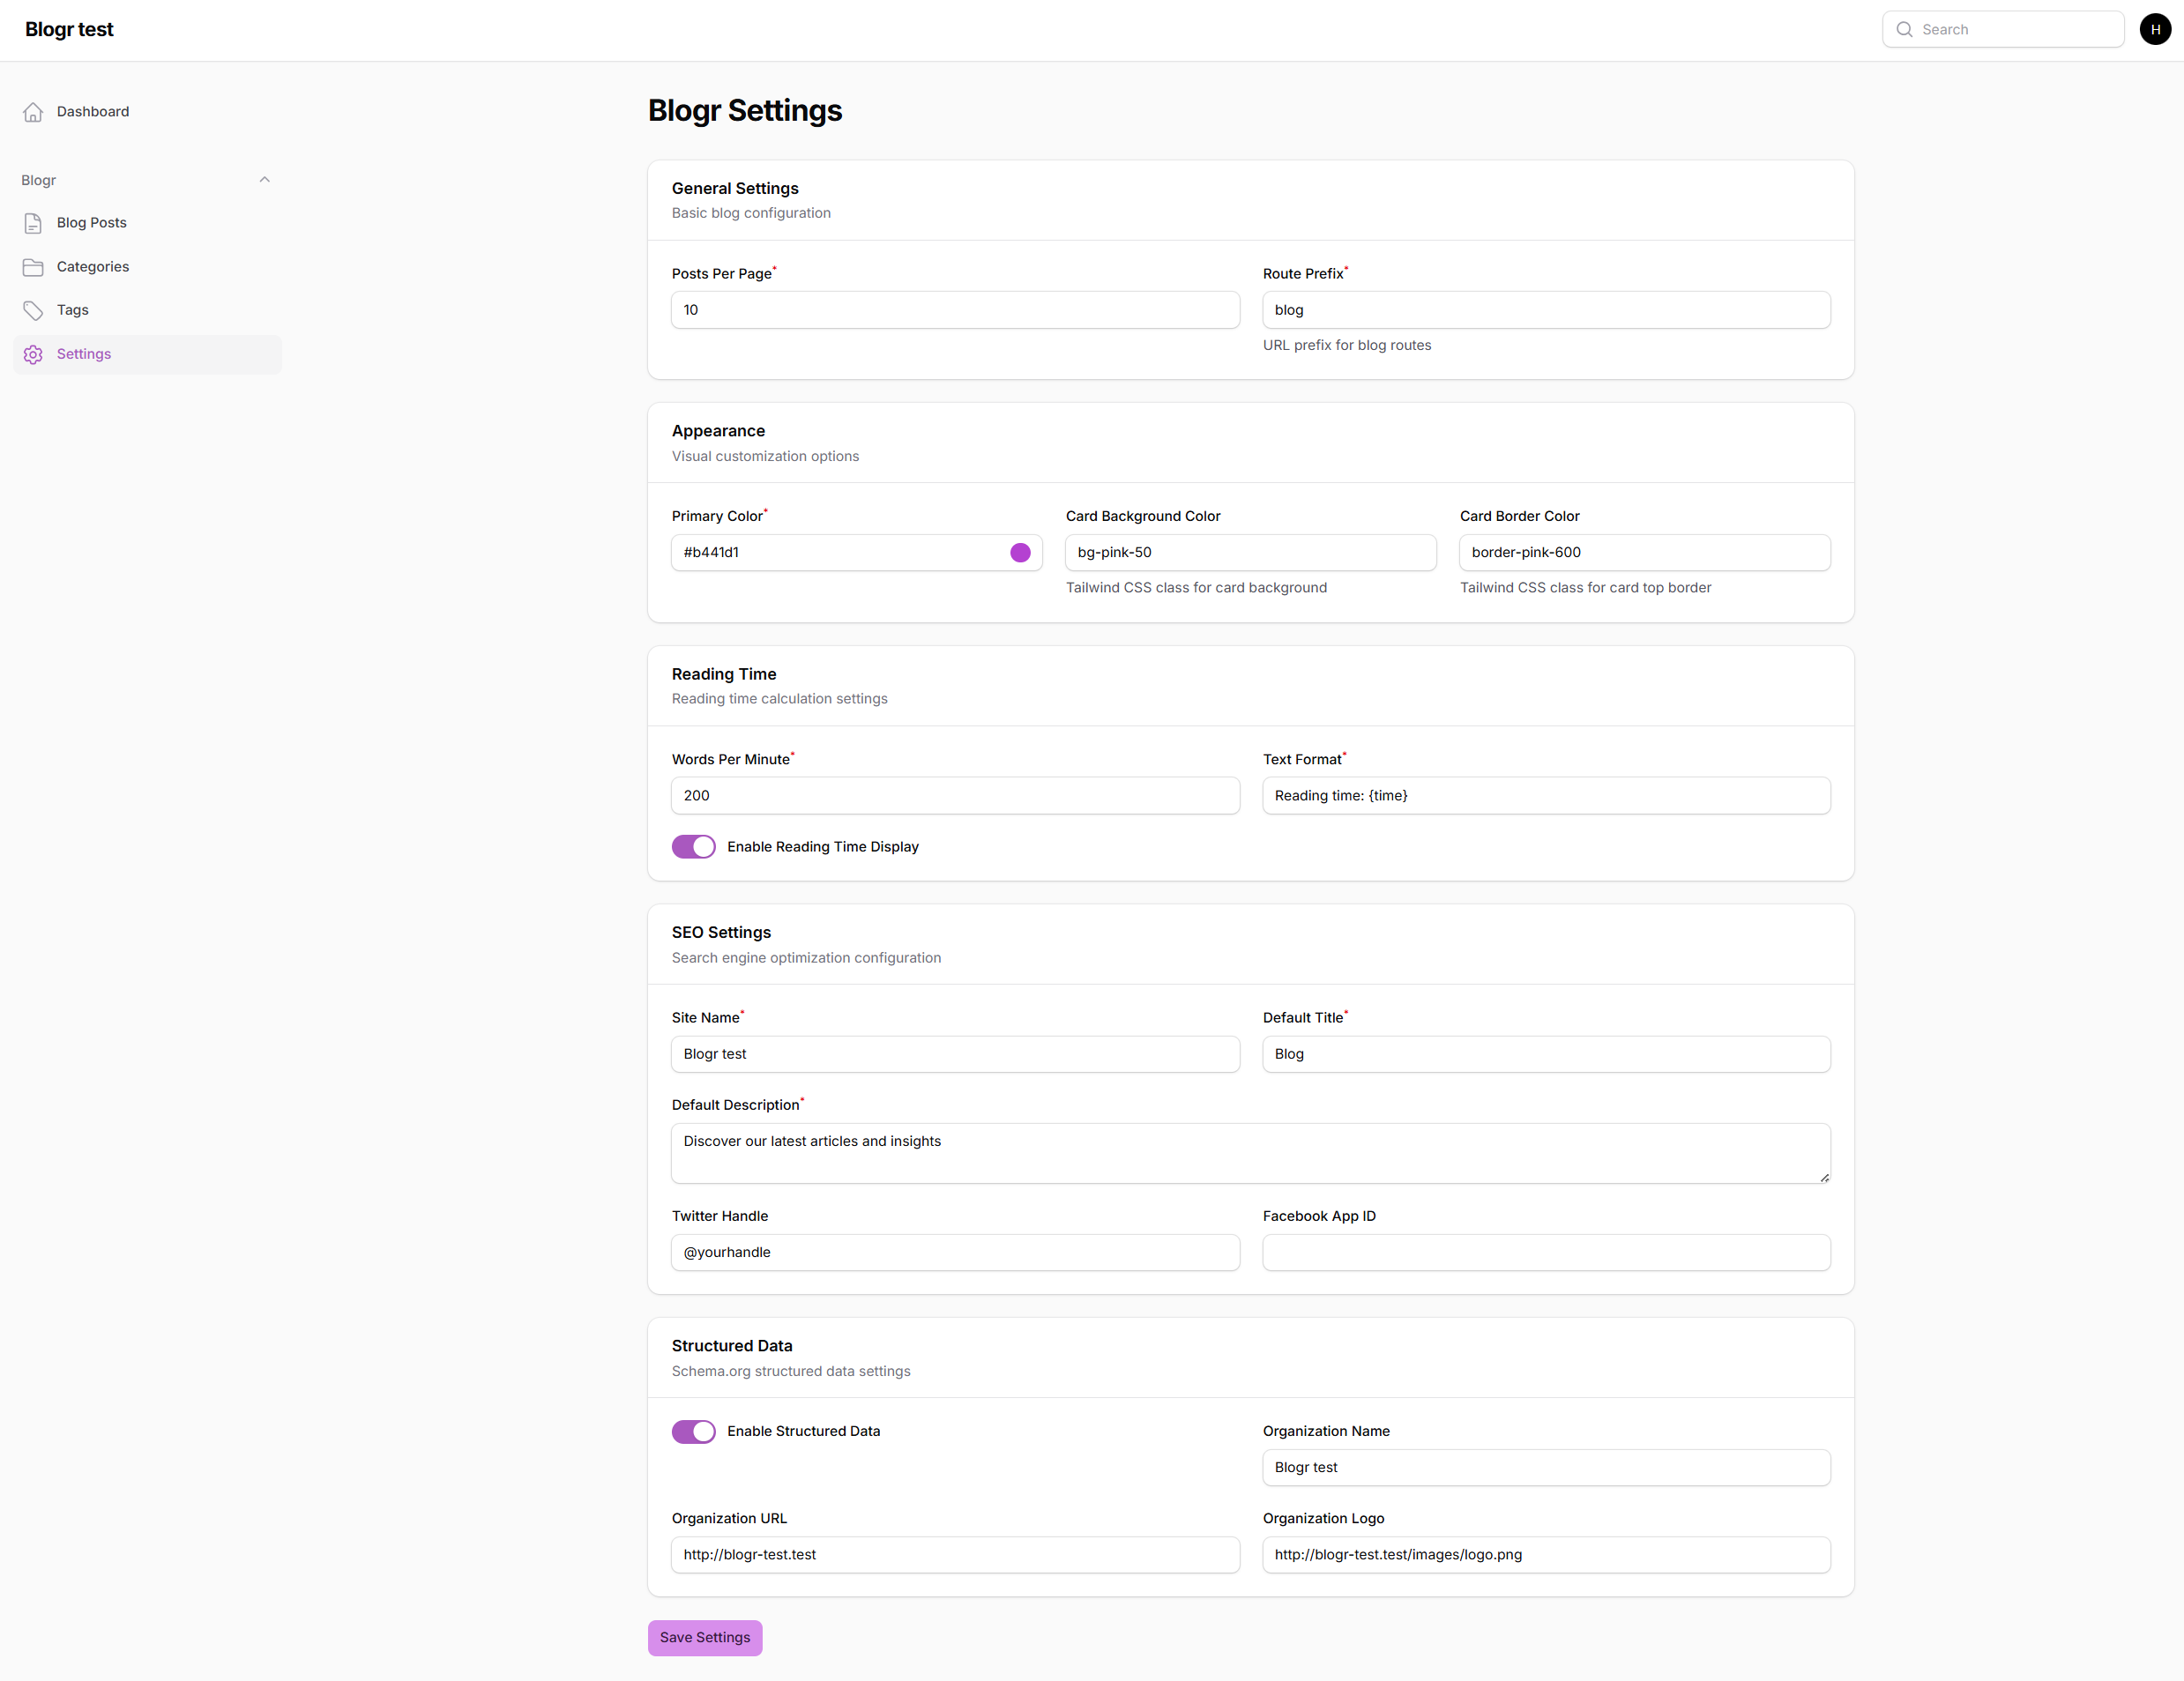
Settings Page
Dashboard Widgets
Interactive Demo
Drag & Drop Images
🚀 Quick Start
Prerequisites
- Laravel 12.x
- FilamentPHP v4.x
- PHP 8.3+
Pre-Installation Steps (if starting from scratch)
If you don't have a Laravel + FilamentPHP project yet, follow these steps first:
1️⃣ Create a new Laravel project
laravel new my-blog
cd my-blog
2️⃣ Install FilamentPHP with admin panel
composer require filament/filament

php artisan filament:install --panels
3️⃣ Create a User model with migration
php artisan make:filament-user
Now ready for Blogr! Continue with the installation below ⬇️
Installation (2 minutes!)
# 1. Install via Composer
composer require happytodev/blogr

# 2. Run automated installer
php artisan blogr:install

# 3. That's it! 🎉
The installer handles everything:
- ✅ Publishes config & migrations
- ✅ Runs database migrations
- ✅ Configures Alpine.js & Tailwind CSS
- ✅ Installs npm dependencies
- ✅ Creates storage symlink
- ✅ Configures CMS preferences (interactive)
- ✅ Comments out default Laravel route (automatic)
- ✅ (Optional) Installs tutorial content
Installation Options
# Full installation (recommended)
php artisan blogr:install

# Skip tutorial content
php artisan blogr:install --skip-tutorials

# Skip asset building (build later)
php artisan blogr:install --skip-build

# Skip all frontend setup
php artisan blogr:install --skip-frontend
Manual Installation
Click for manual installation steps
Skip tutorial and series content
php artisan blogr:install --skip-tutorials --skip-series
### Manual Installation (Advanced)

If you prefer to configure everything manually or need more control, follow these detailed steps:

#### 1. Install Alpine.js

```bash
npm install alpinejs
Then add Alpine.js to your resources/js/app.js:
import Alpine from 'alpinejs'

window.Alpine = Alpine

// Theme Switcher Component (required for light/dark/auto mode)
Alpine.data('themeSwitch', () => ({
    theme: localStorage.getItem('theme') || 'auto',

    init() {
        this.applyTheme();

        // Watch for system preference changes when in auto mode
        window.matchMedia('(prefers-color-scheme: dark)').addEventListener('change', (e) => {
            if (this.theme === 'auto') {
                this.applyTheme();
            }
        });
    },

    setTheme(newTheme) {
        this.theme = newTheme;
        localStorage.setItem('theme', newTheme);
        this.applyTheme();
    },

    applyTheme() {
        const isDark = this.theme === 'dark' ||
                      (this.theme === 'auto' && window.matchMedia('(prefers-color-scheme: dark)').matches);

        if (isDark) {
            document.documentElement.classList.add('dark');
        } else {
            document.documentElement.classList.remove('dark');
        }
    }
}));

Alpine.start()
2. Configure Tailwind CSS v4 for dark mode
Add the dark mode variant to your resources/css/app.css:
@import 'tailwindcss';

@plugin "@tailwindcss/typography";

/* Add these @source directives to include Blogr views */
@source '../../vendor/happytodev/blogr/resources/views/**/*.blade.php';
@source '../views/vendor/blogr/**/*.blade.php';

/* Configure dark mode with class strategy */
@variant dark (.dark &);
⚠️ Important: The @variant dark (.dark &); line is required for the theme switcher to work with Tailwind CSS v4.
3. Publish configuration and migrations
php artisan vendor:publish --provider="Happytodev\Blogr\BlogrServiceProvider"
4. Run migrations
php artisan migrate
5. Add BlogrPlugin to your AdminPanelProvider
1. Publish configuration and migrations
php artisan vendor:publish --provider="Happytodev\Blogr\BlogrServiceProvider"
php artisan migrate
2. Install Alpine.js
npm install alpinejs
Add to resources/js/app.js:
import Alpine from 'alpinejs'
window.Alpine = Alpine

// Theme Switcher Component
Alpine.data('themeSwitch', () => ({
    theme: localStorage.getItem('theme') || 'auto',
    init() { this.applyTheme(); },
    setTheme(newTheme) {
        this.theme = newTheme;
        localStorage.setItem('theme', newTheme);
        this.applyTheme();
    },
    applyTheme() {
        const isDark = this.theme === 'dark' ||
                      (this.theme === 'auto' && window.matchMedia('(prefers-color-scheme: dark)').matches);
        document.documentElement.classList[isDark ? 'add' : 'remove']('dark');
    }
}));

Alpine.start()
3. Configure Tailwind CSS v4
Add to resources/css/app.css:
@import 'tailwindcss';
@plugin "@tailwindcss/typography";

@source '../../vendor/happytodev/blogr/resources/views/**/*.blade.php';
@source '../views/vendor/blogr/**/*.blade.php';

@variant dark (.dark &);
4. Register BlogrPlugin
Edit app/Providers/Filament/AdminPanelProvider.php:
use Happytodev\Blogr\BlogrPlugin;

public function panel(Panel $panel): Panel
{
    return $panel
        ->plugins([BlogrPlugin::make()])
        ->profile(\Happytodev\Blogr\Filament\Pages\Auth\EditProfile::class);
}
5. Build assets
npm run build
First Steps
After installation:
- Access admin panel:
/admin - Create your first post: Admin → Blog Posts → New
- Configure settings: Admin → Blogr Settings
- View your blog:
/blog(or your configured prefix)
📚 Documentation
Configuration
All settings are manageable via the admin panel Settings page or config/blogr.php:
Key Configuration Options
// config/blogr.php

// Route configuration
'route' => [
    'prefix' => 'blog', // Change to '' for homepage
    'middleware' => ['web'],
],

// Multilingual
'locales' => [
    'enabled' => true,
    'default' => 'en',
    'available' => ['en', 'fr', 'es', 'de'],
],

// SEO
'seo' => [
    'site_name' => 'My Blog',
    'default_title' => 'Blog',
    'og' => [
        'image' => '/images/og-default.jpg',
        'image_width' => 1200,
        'image_height' => 630,
    ],
],

// Theming
'colors' => [
    'primary' => '#FA2C36',
],

// Posts per page
'posts_per_page' => 10,
Core Concepts
📝 Blog Posts & Translations
Creating Posts:
- Markdown editor with live preview
- TL;DR summaries
- Custom slugs
- Featured images (drag & drop)
- Categories & tags
- Publication scheduling
Translations:
- Add translations via Repeater in admin
- Each translation has independent:
- Title, slug, content
- SEO meta tags
- Categories & tags
- Automatic language detection
📚 Blog Series
Setup:
- Create series: Admin → Blog Series → New
- Add translations (title, description, SEO)
- Assign posts to series with position ordering
Frontend Components:
{{-- Series navigation (prev/next) --}}
<x-blogr::series-navigation :post="$post" />

{{-- Complete series list --}}
<x-blogr::series-list :series="$series" :currentPost="$post" />

{{-- Series badge --}}
<x-blogr::series-badge :post="$post" />
URL: /blog/series/{slug}
📄 CMS Page Builder
Enable CMS:
// config/blogr.php
'cms' => [
    'enabled' => true,
    'prefix' => '', // Leave empty for /about, or set to 'page' for /page/about
],
Create Static Pages:
- Admin → CMS → Pages CMS → New
- Set slug (e.g.,
about,contact) - Choose template:
- Default: Standard page with sidebar
- Full Width: Wide content area
- Sidebar Left/Right: Custom layouts
- Add translations (title, content, SEO)
- Publish the page
Block System:
Build pages using pre-designed blocks:
// Available blocks
- Hero Section (title, subtitle, CTA, background)
- Features Grid (icon, title, description)
- Testimonials (author, quote, avatar)
- Call-to-Action (button, background)
- Content Block (rich text, Markdown)
- Image Gallery
- Contact Form
Set as Homepage:
- Create a CMS page
- Toggle "Page d'accueil" (Homepage)
- Configure in
config/blogr.php:
'homepage' => [
    'type' => 'cms', // 'blog' or 'cms'
],
Reserved Slugs: These slugs are protected and cannot be used:
blog,feed,author,category,tag,seriesadmin,login,logout,register,dashboardapi,assets,storage,vendor
URL Examples:
- About page:
/aboutor/en/about(with locales) - Contact:
/contactor/fr/contact - Custom prefix:
/page/about(if prefix = 'page')
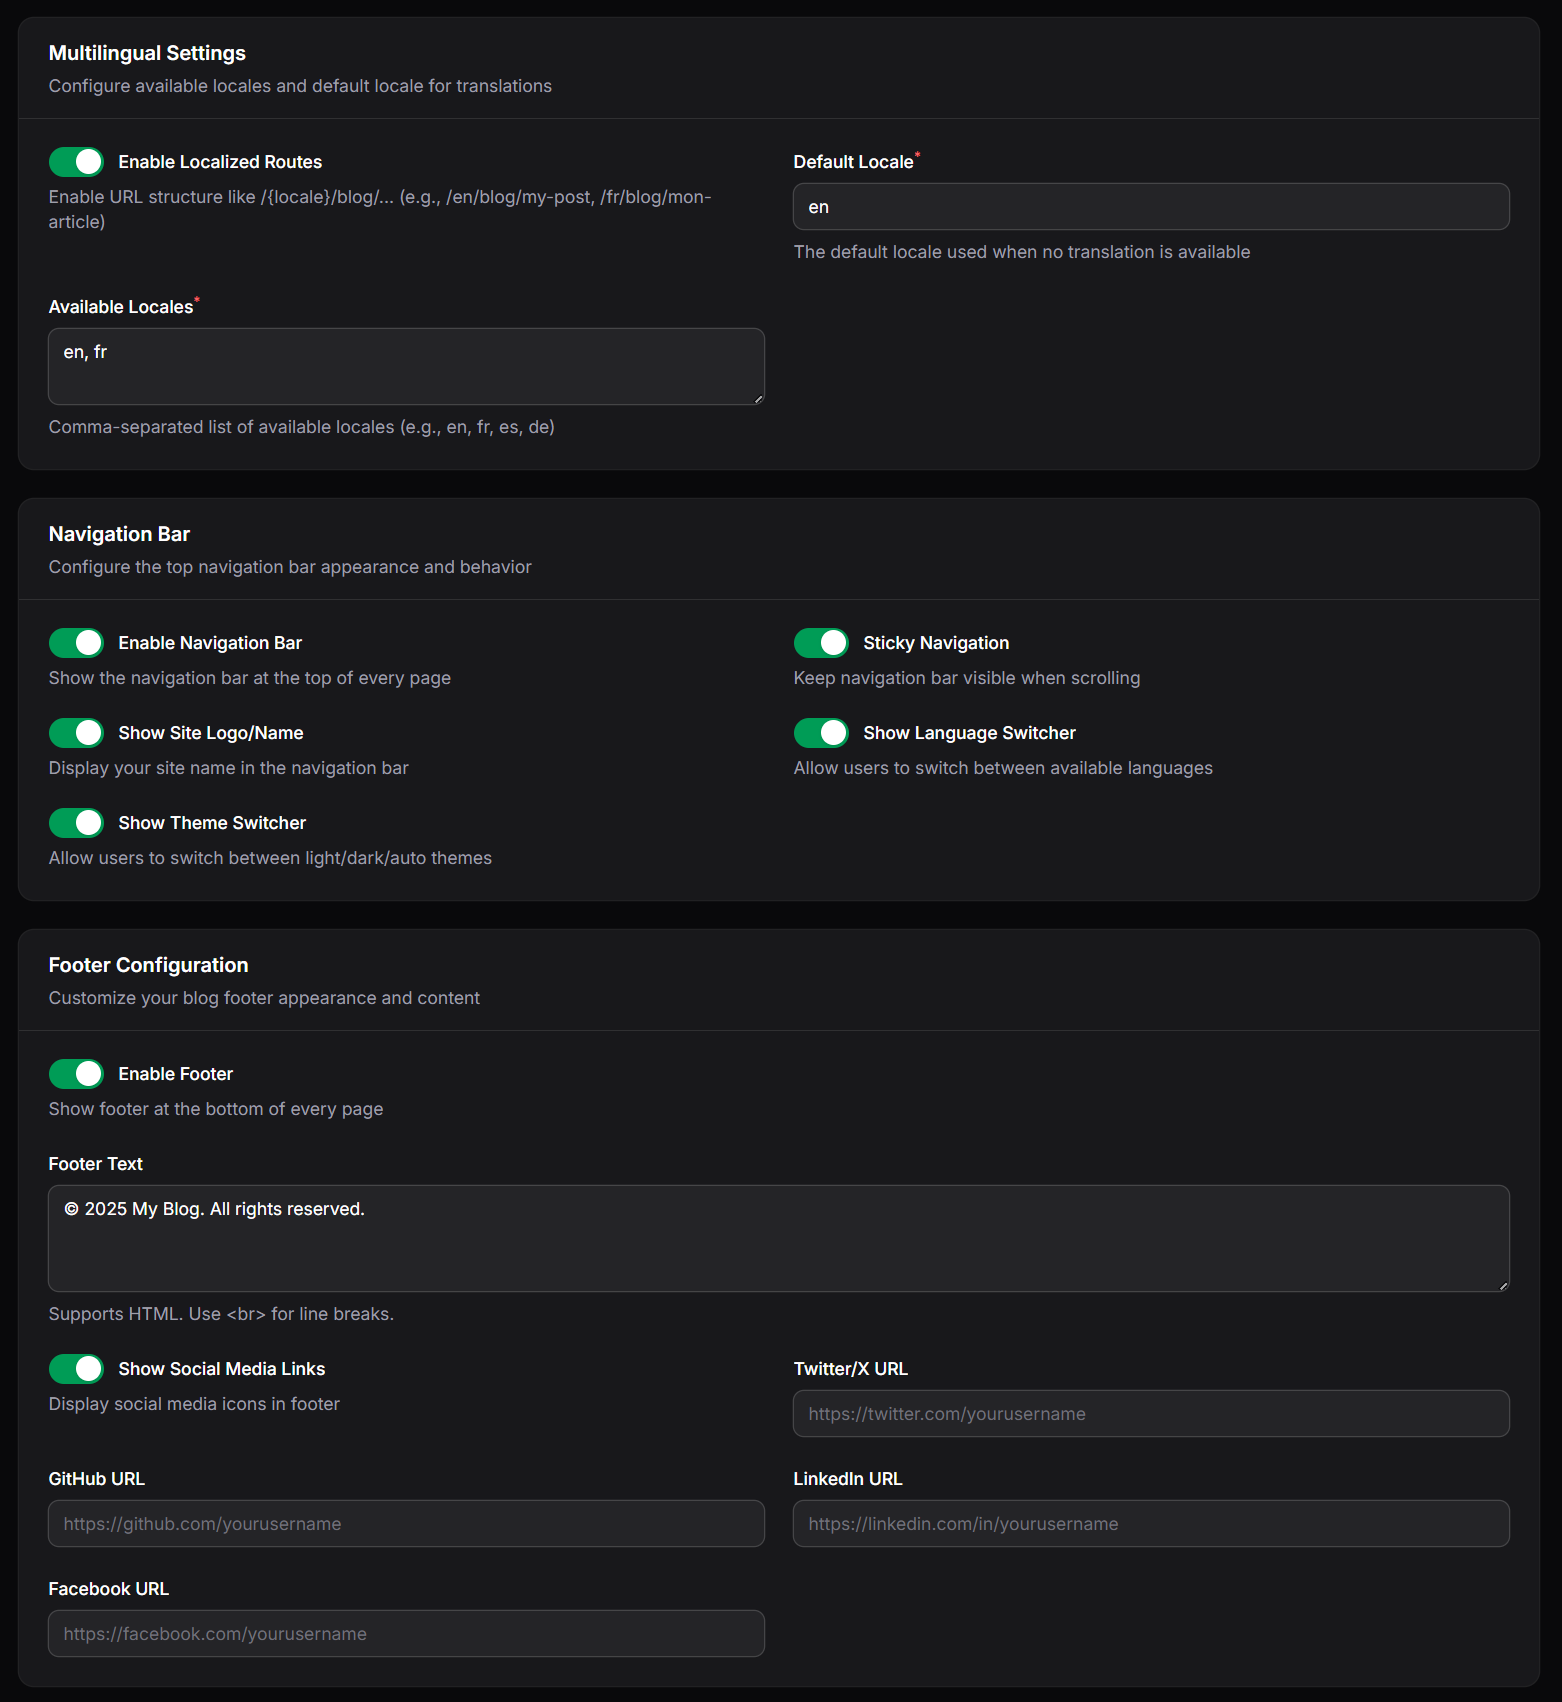
🌍 Multilingual Setup
Enable in Settings:
- Admin → Blogr Settings → Multilingual
- Toggle "Enable Localized Routes"
- Set default locale and available locales
URLs:
- Enabled:
/{locale}/blog/{slug}(e.g.,/fr/blog/mon-article) - Disabled:
/blog/{slug}(translation via relationships)
Components:
{{-- Language switcher --}}
<x-blogr::language-switcher
    current-route="blog.show"
    :route-parameters="['slug' => $post->slug]"
/>

{{-- Hreflang SEO tags --}}
<x-blogr::hreflang-tags
    current-route="blog.show"
    :route-parameters="['slug' => $post->slug]"
/>
💾 Backup & Import
Export Data:
- Admin → Blogr Settings → Backup tab
- Choose format (JSON or ZIP with media)
- Download backup file
Import Data:
php artisan blogr:import backup.zip
What's included:
- Posts, series, categories, tags
- All translations
- Media files (images, avatars)
- Relationships preserved
👤 Author Profiles
Self-Service Profile:
- Click user avatar → Edit Profile
- Upload avatar (auto-cropped)
- Write bio (Markdown supported)
- Update password
Author Bio Component:
{{-- Full bio box --}}
<x-blogr::author-bio :author="$post->user" />

{{-- Compact inline --}}
<x-blogr::author-bio :author="$post->user" :compact="true" />
Configuration:
'author_profile' => ['enabled' => true],
'author_bio' => [
    'enabled' => true,
    'position' => 'bottom', // top, bottom, both
    'compact' => false,
],
Advanced Features
🔍 SEO Configuration
Per-Post SEO:
- Meta title & description
- Keywords
- Custom OG image
- Auto-generated Schema.org markup
Global SEO:
'seo' => [
    'site_name' => env('APP_NAME'),
    'default_title' => 'Blog',
    'twitter_handle' => '@yourhandle',
    'og' => [
        'type' => 'website',
        'image' => '/images/og-default.jpg',
    ],
    'structured_data' => [
        'enabled' => true,
        'organization' => [
            'name' => 'My Blog',
            'logo' => 'https://yoursite.com/logo.png',
        ],
    ],
],
📊 RSS Feeds
Available Feeds:
- Main:
/{locale}/blog/feed - Category:
/{locale}/blog/feed/category/{slug} - Tag:
/{locale}/blog/feed/tag/{slug}
Configuration:
'rss' => [
    'enabled' => true,
    'limit' => 20,
    'cache_ttl' => 3600, // 1 hour
],
🎨 Theming
CSS Variables:
:root {
    --blogr-primary: #FA2C36;
    --blogr-category: #3B82F6;
    --blogr-tag: #10B981;
}
Dark Mode:
- Auto-detection via system preference
- Manual toggle (light/dark/auto)
- Configured via Alpine.js component
Customization Points:
- Card colors & borders
- TOC positioning (center, left, right sidebar)
- Publication date display
- Tag positioning (top/bottom)
- Heading permalinks (symbol, spacing, visibility)
🧪 Testing
Blogr is battle-tested with 680+ tests and 1900+ assertions:
cd vendor/happytodev/blogr
./vendor/bin/pest --parallel

# Test coverage
Tests:  56 skipped, 725 passed (2122 assertions)
Test Coverage:
- ✅ Import/Export with media files
- ✅ Multilingual translations
- ✅ Blog series relationships
- ✅ SEO meta tags & Schema.org
- ✅ Author profiles & permissions
- ✅ RSS feed generation
- ✅ Database schema integrity
🗺️ Roadmap
🎯 RC1 (November 2025) - Feature Complete
- Import/Export system with media backup
- CMS Page Builder – Create static pages with block system
- Global Search – Search posts, users, CMS pages from admin ✨ NEW
- Enhanced Tables – Sortable columns, advanced filters ✨ NEW
- Admin Notifications – Notify admins when writers save posts ✨ NEW
- Dark Mode Wave Separators – Gradient-aware transitions ✨ NEW
- User Management Resource – Full CRUD for admin users ✨ NEW
- Quick Visit Site Widget – One-click blog access ✨ NEW
- Theme presets (predefined color schemes)
- Comprehensive testing for v1 release
✅ Beta 3 (Completed - September 2025)
- Full multilingual support
- Blog series feature
- Writer role with permissions
- RSS feeds (global, category, tag)
- Configurable TOC positioning
- Theme system with dark mode
- Author profiles & bios
- Customizable permalinks
- Language switcher component
- Footer & navigation settings
✅ Beta 2 (Completed - September 2025)
- SEO fields (meta, OG, Schema.org)
- Scheduled publishing
- Quick publish toggle
- Auto-generated TOC
- Reading time calculation
- Dashboard widgets
- Settings page with tabs
- Tutorial content seeder
🤝 Support
Need Help?
📖 Full Documentation • 🐛 Report Bug • 💡 Request Feature
Love Blogr?
If this package saves you time, consider:
📄 License
MIT License – See LICENSE.md for details.
👏 Credits
Created with ❤️ by Frédéric Blanc
Contributors:
Special Thanks:
- FilamentPHP team for the amazing framework
- Laravel community for continuous inspiration
- All users providing feedback and bug reports
Made with ❤️ using Laravel & FilamentPHP